Convert any image to selectable text
We have seen pictures represented as text at many places. We often find them in cell phone messages or online greetings like the one below:
Hearts layered
_____$$$$__________$$$$$
___$$$$$$$$______$$$$$$$$$
__$$$$$$$$$$____$$$$$$$$$$$
_$$$$$$$$$$$$__$$$$$$$$$$$$$
_$$$$$$$$$$$$$_$$$$$$$$$$$$$
$$$$$$$$$$$$$$$$$$$$$$$$$$$$
$$$$$$$$$$$$$$$$$$$$$$$$$$$$$
$$$$$$$$$$$$$$$$$$$$$$$$$$$$$_$$$$
$$$$$$$$$$$$$$$$$_____$$$$$$$______$
$$$$$$$$$$$$$$$$________$$$$________$
$$$$$$$$$$$$$$$__________$$__________$
$$$$$$$$$$$$$$___________$___________$
_$$$$$$$$$$$$$_______________________$
__$$$$$$$$$$$$_______________________$
___$$$$$$$$$$$_______________________$
____$$$$$$$$$$_______________________$
_____$$$$$$$$$_______________________$
______$$$$__$$$__$$$$$_______________$
_______$______$_$_____$_____________$
______$_______$$______$_____________$
______$________________$___________$
______$________________$__________$
_______$_______________$_________$
_______$______________$_________$
________$_____________$________$
_________$___________$$______$
__________$_________$__$____$
___________$_______$_____$$
____________$$___$$
______________$$$
_______________$
Although most of these are manually created, I had the curiosity to automatically convert a given image to this kind of selectable text. The basic idea is
to convert the image pixel by pixel into characters. The characters chosen for a pixel will depend on the Red, Green and Blue intensity of the pixels.
Simply putting – A darker pixel will be represented with a darker looking character like ‘$’ or ‘Æ’ while the lighter pixel will be represented by a
lighter character like ‘.’ or ‘,’. So I divided the problem into two parts:
1. Arranging ASCII Characters from ‘light looking’ to ‘dark looking’ ones.
2. Converting the image to text pixel by pixel using the array of ASCII characters generated from previous step.
I found out the array of step 1 using another program. Please refer to my detailed experiment on finding the lighter and darker characters of ASCII.
Here is the array that I generated:
ÆÑÊŒØMÉËÈÃÂWQBÅæ#NÁþEÄÀHKRŽœXgÐêqÛŠÕÔA€ßpmãâG¶øðé8ÚÜ$ëdÙýèÓÞÖåÿÒb¥FDñáZPäšÇàhû§ÝkŸ®S9žUTe6µOyxξf4õ5ôú&aü™2ùçw©Y£0VÍL±3ÏÌóC@nöòs¢u‰½¼‡zJƒ%¤Itocîrjv1lí=ïì<>i7†[¿?×}*{+()\/»«•¬|!¡÷¦¯—^ª„”“~³º²–°¹‹›;:’‘‚’˜ˆ¸…·¨´`
You can easily see that the characters in the beginning look dark and they progressively become light towards the end. We will use this character string to
convert our image to text.
PART 1 : Generating a Black and White text from the Image
In the first part of our experiment we will have a black and white text as output. Although, this is not the end of the story. In our second experiment we
will see how to make a colorful text as output. So first, here is the algorithm to convert the image into a uni-color text:
PROCEDURE CONVERT_IMAGE_TO_TEXT (IN IMAGE_FILE, OUT IMAGE_STRING)
DEFINE IMAGE = LOAD_IMAGE_TO_MEMORY(IMAGE_FILE);
IMAGE_STRING = NULL;
DEFINE PIXEL_COLOR = NULL;
DEFINE ASCII_ARRAY[] = “ÆÑÊŒØMÉËÈÃÂWQBÅæ#NÁþEÄÀHKRŽœXgÐêqÛŠÕÔA€ßpmãâG¶øðé8ÚÜ$ëdÙýèÓÞÖåÿÒb¥FDñáZPäšÇàhû§ÝkŸ®S9žUTe6µOyxξf4õ5ôú&aü™2ùçw©Y£0VÍL±3ÏÌóC@nöòs¢u‰½¼‡zJƒ%¤Itocîrjv1lí=ïì<>i7†[¿?×}*{+()\/»«•¬|!¡÷¦¯—^ª„”“~³º²–°¹‹›;:’‘‚'˜ˆ¸…•¨´`”
DEFINE ARRAY_LEN = LENGTH(ASCII_ARRAY);
DEFINE PIXEL_COLOR, RED_VALE, GREEN_VALUE, BLUE_VALUE;
DEFINE AVERAGE_VALUE, ARRAY_INDEX;
FOR EACH PIXEL IN IMAGE
PIXEL_COLOR = GET_COLOR(PIXEL);
RED_VALUE = GET_RED(PIXEL_COLOR);
GREEN_VALUE = GET_GREEN(PIXEL_COLOR);
BLUE_VALUE = GET_BLUE(PIXEL_COLOR);
AVERAGE_VALUE = (RED_VAL + GREEN_VAL + BLUE_VAL)/3;
ARRAY_INDEX = ARRAY_LENGTH * (AVERAGE_VALUE / 255);
IMAGE_STRING = IMAGE_STRING + ASCII_ARRAY[AVERAGE_VALUE];
END FOR
RETURN IMAGE_STRING;
END PROCEDURE
I implemented this program in DEV C++ using WIN BGI graphics API. You can find the source files here [SOURCE FILES].
Here are some actual outputs from the program:
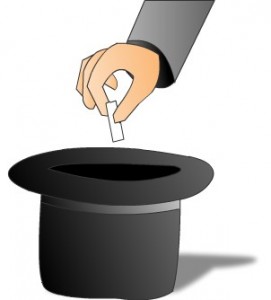
Original Image as input:
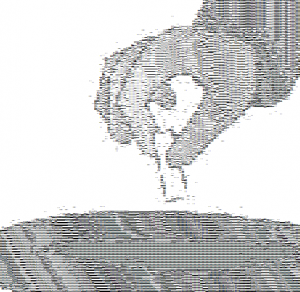
The selectable text output:
Here is a preview of the text generated.
Click here to see the complete select-able output text.
PART 2 : Generating colorful text from the image.
In the second part of our experiment we will see how to give color to the characters generated in our algorithm. For this, I have used HTML as output since
it is simple and easy to experiment with. You can use other formats like RTF to put colorful text as your output. To understand how to convert the pixel
color to HTML, we need to understand both the formats first:
Color Format in WIN BGI:
Color in WIN BGI is in 24 Bit format. It is stored as a long integer in the memory. We can directly use a pointer to read the color values (which is
faster) or use predefined WIN BGI functions to access the color values (which is easier). Let’s go with the easier way for now.
Win BGI has straightforward functions to obtain color values of pixels. Here are they:
- getpixel(int x, int y)
– This function extracts the color value of a pixel, given its coordinates. - RED_VALUE(), GREEN_VALUE(), BLUE_VALUE()
– These functions are used to extract the individual color components of a pixel color. They take the color value as the argument (obtained from the
previous step).
Color Format in HTML:
HTML on the other hand uses hexadecimal notation to represent colors. The color is represented in #RRGGBB format where RR represents Red, GG represents
Green and BB represents Blue components of color in Hexadecimal. So #FF0000 represents red (See the absence of green and blue components).
A typical HTML page can apply the color to text in the following way:
<FONT COLOR=’#RRGGBB’>COLOR TEXT</FONT>
So in our case, we use the character from the ASCII Array as the text and the color of the pixel as the font color in HTML.
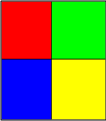
So, if our image consisted of only 4 pixels, it would be converted to HTML as shown below:
|
A source image sample with 4 pixels (Highly zoomed). |
HTML Code Generated: <font color=’#00FF00′>á</font><br> <font color=’#0000FF’>á</font> <font color=’#FFFF00′>I</font> <br> stands for break or new line in HTML. |
And now, here is some real output:
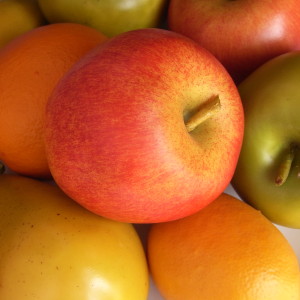
Original Image:
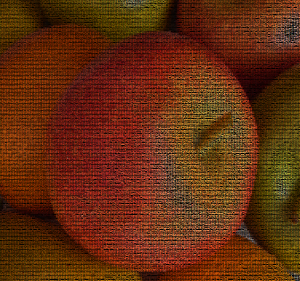
Colorful Text format:
Here is a preview of the colorful text generated.
Click Here to see the complete selectable text.
Isn’t that Amazing!! A text representing a picture.
I hope you liked this mini project for converting pictures to text. Browse my website for more such informative and interesting projects.
I would love to know more from you. Please post your queries and suggestions below.
4 Responses
[…] This experiment is part of my larger experiment on converting any image to text. In this part I am going to explain how to arrange ASCII characters from darker to lighter ones. […]
[…] Convert any image to selectable text. […]
[…] Convert any image to selectable text. […]
[…] This experiment is part of my larger experiment on converting any image to text. In this part I am going to explain how to arrange ASCII characters from darker to lighter ones. […]